Friday, December 30, 2011

Live the Life You've Imagined, Part 21


Over the past week we squeezed in lots of Christmas joy with both of our families. On Christmas Eve we made a trip to gaze at a large light display in Rosemont, Illinois. Rosemont had a live nativity, complete with Christmas geese and a donkey.


1.    I snapped photos with my phone while spinning underneath the Christmas lights. (It sort of looks like a sonogram, but that’s not the look I was trying to achieve.)
2.    Gingerbread houses.
3.    Family ice skating on Christmas Eve.
4.    During week 16 of my happiness project, I told you that I wanted a rotary dial phone like Grandma Kregel’s. I received my very own rotary phone on Christmas. Now I just need a land line.
5.    My mom has a stock pile of vintage wrap and gift tags. I will be sad when the supply runs out.
6.    Pretty sunset on the 23rd.
7.    We did not have a white Christmas. It was actually pretty warm by Indiana standards. (about 43 degrees F) However, the 27th of December was quite picturesque.
8.    We went to see a movie at Hollywood Boulevard. It was a special treat. I think all theatres should serve margaritas.
9.    All the stockings were hung by the chimney with care.


Thursday, December 29, 2011

Tea Stained, Painted Lamp Shades


The layout of our first floor is a bit disjointed. We have a long narrow kitchen, a dining room, living room, and a second dinning location attached to the family room. I suppose dining location B could be considered a breakfast nook; however the room lacks the usual components of a nook. Anyways, this room is a bit more country than I would prefer.  The light fixture came with the house, the farmhouse table was a hand-me-down from a friend, and the dining room chairs were rescued from the dumpster at my last apartment. I have a few small projects in mind to make the room more cohesive and less country.


The light fixture looked like this when we purchased the house. I planned to replace this light, until a friend suggested I add mini lamp shades to the fixture.


I found these mini lamp shades at Lowes about a year ago. The color difference between the white shades and cream candles always bugged me. I considered painting the candles bright white to match the shades. Then my brilliant cousin recommended tea staining the lamp shades to match the fixture. (From this project, I learned that asking for design input from house guests is beneficial)

I brewed up a big bucket of tea and let the mini lamp shades soak overnight.
The shades now match the candles with the subtle color change from tea staining.

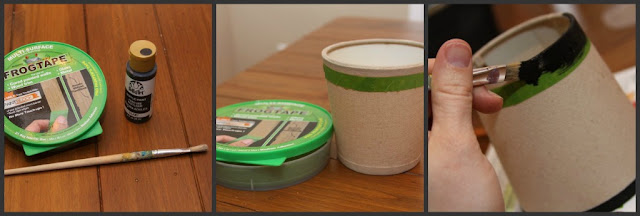
I used frog tape and black acrylic paint to add trim to the mini lamp shades.


I am pleased with my tea stained, painted lamp shades. Now I am contemplating adding the mini shades to the kitchen light fixtures too.


My next project for this room will be painting the dumpster dining chairs.  


Friday, December 23, 2011

Live the Life You've Imagined, Part 20


This week I have been running around finishing up Christmas gifts and projects. I don’t know how I pulled this off when I worked fifty hours a week and I cannot even imagine what it will be like once we have kids. This morning I woke up early and baked chocolate chip cookies, peanut butter kiss cookies, sugar cookies with peppermint icing, fudge and two batches of chocolate covered pretzel peanut butter balls.


1.    Pretty alstroemeria at the flower shop.
2.    Winter SpringleTM from the very talented MB. She needs to create a blog ASAP.
3.    We attended an entertaining Ugly Christmas Sweater Party. I wore this lovely mass of sequins along with some holiday bows in my hair.
4.    A giant cooler of meat arrived at our doorstep Wednesday night. A nice Christmas surprise from Aunt Lois.
5.    Don’t you think it would be cool to work on a wind farm?
6.    & 7. I hosted a cookie decorating party at the house on Saturday.
8.  I am jumping on the bandwagon. I purchased this baker’s twine from Pick Your Plum.
9. I wanted in on the Elf on the Shelf action. Flat Stanley found a mischievous  friend.

I hope you have a Merry Christmas, Happy Hanukkah, Joyous Kwanza, or just a fabulous weekend!


Thursday, December 22, 2011

DIY Christmas Flowers


I started working in a flower shop three weeks ago. I decided to put my new skills to work by making our moms Christmas flower arrangements. (Hopefully neither of them read this post before I get the chance to hand deliver my creations.) I did not take any photos before my work was done. I’m sorry I was too busy creating and not thinking of blogging.


Besides, my boss probably would not be happy if I divulged all of the insider flower shop secrets I just learned. Instead of explaining how to arrange flowers, I will share a few tips on reducing the cost of DIY arrangements. Each of these arrangements cost me $5 each and I did not receive any sort of employee discount.


My first tip is to repurpose old containers. I patronized Goodwill. The green vase cost twenty five cents and I splurged on the stainless steel container by paying a whole dollar.


The flowers came from a local shop that often has unarranged flowers on special. You can also buy flowers like these from the grocery store. The greenery was free for the taking when we bought our Christmas tree. I also scavenged our yard for a variety of evergreen branches.
To save even more money on my DIY Christmas arrangements, I wired the pinecones myself. In addition, I used sparkly picks that I found for less than a quarter a piece last year at Michael’s.

Although the DIY Christmas arrangements did not cost much, I did make a huge mess across the kitchen floor. It took a considerable amount of time to put everything together and clean up the mess.  

I really hope one of my wonderful family members bought the handheld pruners that were on my wish list. (Just what every girl dreams of…) The giant limb loppers are awkward and the kitchen shears have been taking a beating.


One last tip, I bought the wet floral foam at Joann Fabric with my online 40% off coupon. The flower shop was out of inexpensive red flowers. I enjoy the fact that the arrangements have flowers that are not traditionally associated with the holidays, yet they still have a Christmassy feel.


Wednesday, December 21, 2011

Christmas Card Holder


Each year I look forward to December and receiving Christmas cards. I love real mail delivered by the mail man. Moreover, I enjoy sending mail almost as much as discovering a hand written card in the mailbox.

Last year I made this Christmas card hanger that is strung up above the couch in the living room. I made the letters using old book pages, pipe cleaners and letters I printed from Picnik.

The Christmas cards are secured to the picture hanging wire with these tiny clothespins.

A large vase filled with Grandma’s vintage Christmas ornaments and some battery operated lights to add more cheer to the room.


Monday, December 19, 2011

Christmas Cloche


I decked out this glass Christmas cloche last year with three sisal trees I found at Menards, some artificial snow, and a Scrabble message. Previously, the winter scene looked more festive because I had the base painted red.


This monochromatic Christmas cloche needed an extra dose of holiday cheer.

In case you find yourself wondering where the cloche originated, I purchased a glass domed clock from Goodwill and removed the inner pieces.


I saw Martha Stewart’s glittered deer floating around on Pinterest. I knew these glittery dollar store toys would be the perfect addition to my Christmas cloche. Much to my dismay, the Dollar Tree was out of small plastic woodland creatures.  


I ordered a gift from Photojojo. (If you have a camera lover to shop for, I recommend paying them a visit) Along with the purchased item, I received a plastic dinosaur in the mail. On the bill, it said “Rawr” $0.00. This little bit of whimsy made my day.
I gave Rawr a holiday makeover using glue, (Can you believe I don’t have the regular Elmer’s variety?) a paint brush, and fine Martha Stewart glitter.

First I used the paint brush to dose the dinosaur in glue. Any kind of glue will do.


Next I poured glitter over the wet glue. I had to do several touch ups with a bit of glue on the paint brush.


I also added some sparkly pipe cleaner pieces to make the sisal trees a little cheery.

It may be tacky, but my Christmas dinosaur makes me happy.


Friday, December 16, 2011

Live the Life You've Imagined, Part 19


The lights around monument circle in Indianapolis are so pretty. Luckily traffic was going pretty slow, so I was able to take a few photos.


1. The ornamental kale I planted in the fall is even more vibrant now.
2. I planted some paper whites today. I bought them on clearance last year. I hope they still grow.
3. Life as a flower shop employee is good. I was making lots of Christmas themed arrangements this week. After work my hands smelled like a pine tree.
4. Last Sunday we picked out or live tree and managed to fit it into my tiny car.
5. Flat Stanley tagged along while I was volunteering at Riley Children’s hospital. This week I had the opportunity to hand out toys with Scotty's Brewhouse. You can read about the experience on their blog.
6. On Saturday I got to live a day in the life of an extreme couponer. Marsh, our grocery store, was tripling coupons.
7. IPL building lit up like a Christmas tree.
8. I made dozens of sugar cookies in preparation for tomorrow’s cookie decorating party.
9. Monday I met my cousins at the Hard Rock Cafe. We found another great deal on hip2save. In celebration of their 40th anniversary, Hard Rock had coupons for a legendary burger, drink and fries for $4.
.


Have a wonderful weekend!

Wednesday, December 14, 2011

Goodwill Apron

I told you about my most recent Goodwill treasures in Monday’s post. I spied this skirt while waiting in the mile long line.


People would presume that I shop in the girls department if I wore this skirt off the rack, but I had bigger plans for this frilly number. I was inspired to transform it into a girly apron, a task my rudimentary sewing skills could handle.  

First I cut the skirt into two pieces. I cut off the original seams. Then I used my sewing machine to make two less than perfect hems up the sides. Finally I attached some thick yellow ribbon and I was done. Super easy.  
The skirt cost me a whopping $1.50 and I have enough fabric to make two aprons. I think 75¢ per apron is a great bargain. Who knows, I may get really crazy and add pockets to apron number two.