Monday, October 31, 2011

Pumpkins & Seeds

Carving pumpkins is my favorite part of Halloween. I usually use patterns to help execute my pumpkin masterpieces. They take a ridiculous amount of time, but it's only once a year and I got to watch several episodes of the Nate Show.


Two quick tips:
1.I use a ton of packaging tape to make sure the pattern doesn't move while I'm busy poking.
2. Once poking is complete, I give the pumpkin a quick rub down with flour. This makes the dotted line much easier to see.


Josh might love pumpkin seeds more than I enjoy carving.

Moon Cajun Pumpkin Seeds
  • Soak pumpkin seeds in water for several hours.
  • Boil seeds in a salt solution for ten minutes.
  • Spread out on a baking sheet covered with foil.
  • Sprinkle with kosher salt, Cajun seasoning, and Tony's creole seasoning.
  • Bake at 400 degress for 10-15 minutes or until golden brown.

    Friday, October 28, 2011

    "Live the Life You've Imagined' Part 13

    I snapped this photo on the way home from the farm. I'm going to miss these drives through the country. For some reason it reminds me of The Wizard of Oz.

    1. Tree Ombré in the backyard. Photo taken on Sunday.
    2. Our last share of CSA goods. Once the flowers, leaves and veggies are gone, I'm going to have to get creative with my photos.
    3. Book club tonight. We will be discussing Triple Crossing by Sebastian Rotella
    4. I found one of the wines I enjoyed on our wine tasting adventure at Meijer and it was cheaper.
    5. Forgot to buy taco seasoning. Made my own with this recipe.
    6. Excited to finally start volunteering at Riley. In addition to the experience, I get free McDonald's ice cream cones!
    7. The trees were throwing a party.
    8. I regret not doing more with the apples on our trees this year. They still look pretty as they decay.
    9. Same tree as the first photo. This photo was taken on Wednesday.

    Thursday, October 27, 2011

    Gallery Wall


    I recently put up a gallery wall in one of our hallways. It is not perfect and I will continue to tweak it, but done is better than perfect. I received some good tips on hanging photos for a gallery wall at westermanfam and feltsocute.


    My first order of business was to find frames that looked like they belonged together. I was not going to spend a ton of money on this project. I used some frames I already had and the rest were purchased at Goodwill. Any frames that were not black got a few coats of spray paint. Once all of the photos were in their designated frames, I arranged them on the floor to get an idea of how I wanted to hang them on the wall.


    I traced each frame on newsprint and cut out paper templates. On all of the templates I marked where the nail needed to go. I adhered these to the wall using painters tape. I was able to easily make adjustments to the arrangement. Once I was satisfied with their placement, I hammered the nails right through the paper.


    I bought the vinyl quote from pickyourplum. I think it cost around $5, including shipping. My mom used to sing to me "My Favorite Things" from The Sound of Music while I was in the bathtub, so the quote has special meaning.

    The blank picture frame needs a photo, but I'm procrastinating since it is missing the glass.


    The lovely letter was handcrafted by Grandma Kregel to go along with Josh's Christmas present last year. I found the photo mats at the Dollar Tree. I paid $1 for two of them. I used a level and some velcro tabs to make sure the frames continue to hang evenly on the wall.


    I have contemplated reprinting all of the photos in black and white. The beach photo with the turquoise ocean is the only thing holding me back. The thermostat bothers me too; it may get a frame someday. Despite the gallery wall's faults, it still makes me happy to walk down this hallway and see so many people and places we love.

    Wednesday, October 26, 2011

    I Heart Bulbs

    iPhone photos of spring blooms in our yard.
    Clockwise from top left: allium, hyacinths, mini-daffodils, grape hyacinths

    I love planting bulbs. I think of them as a gift I plant for myself to open up in the spring. Even if you do not have a green thumb, bulbs are pretty hard to mess up. There are a lot of rules and guidelines for planting bulbs. I have disregarded most of them and the bulbs still bloom.

    My aunt has been buying me bulbs for my birthday since I was in college. Some girls ask for clothes, I ask for bulbs. This year I received large cup daffodils, grape hyacinths, and tons of crocuses from my in-laws.

    All you need is a shovel to plant them, but this year my dad let me borrow his fancy bulb auger.

    Josh was nervous about me using his drill. I think I will be getting my own soon. Most packages usually recommend planting bulbs 4-6" apart. If you follow the rules and plant your bulbs individually, this auger would definitely be beneficial. It is much more efficient than the bulb planter pictured below.


    While I was happily planting daffodils, Josh directed my attention to our apple trees. Low and behold, there was Woodrow the Woodchuck munching on some apples. He made my day. If you look closely, you  can see his tongue sticking out.

    If you have a lot of critters, like Woodrow and squirrels, who may view your bulbs as a delicious treat, daffodils are going to be your best bet. They do not taste very good and they can be toxic, so the rodents and deer steer clear.

    As I mentioned above, I do not follow all of the rules. I usually dig a whole and plop in 5-6 bulbs. This method is faster and it looks more natural when the flowers bloom in a cluster.

    This year I even planted some crocuses in our yard. These guys are one of the first flowers to pop up. They bloom before the grass starts growing and eventually you just mow over the foliage. I will let you know how my little experiment works in the spring.

    It is tempting to cut down leaves once the blooms fade. Don't. Wait about six weeks after the plant is done blooming to cut the foliage. The leaves feed the bulbs and cutting them down decreases the chances of having a healthy plant the following year. For more tips from real experts go to to: www.bhg.com or www.marthastewart.com


    You do not have to wait until spring to enjoy some good bulb fun. I like planting amaryllis and paper whites in the winter. It's nice seeing something alive when everything outside is grey and dead. You can find these at most hardware stores.

    Tuesday, October 25, 2011

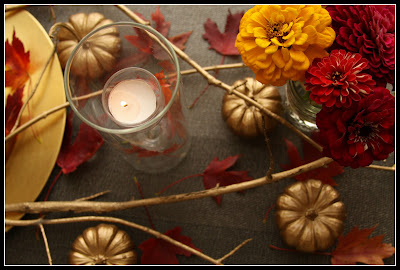
    Glamor Pumpkin Table

    I told you about how I was not going to spend any money on 'stuff' in October here. When I decided to decorate our dinning room table I had to get resourceful.

    I don't even remember what I used the gold spray paint for, but I was delighted when I found it in our garage. I sprayed some white, munchkin pumpkins and a small, white pumpkin with a few coats.

    I filled two jelly jars with zinnias from my parent's yard.

    I used jute I already had to tie leaves to the jars.


    I purchased the gold charger after Christmas a few years ago. It probably cost me a quarter.

    The leaves are the real deal. The neighbors may have been wondering why I was wandering around the yard collecting leaves, oh well. The sticks were also found in the yard and received a quick coat of spray paint.

    I painted the M freehand on the gold pumpkin using black, acrylic paint. It probably would have looked better if I used a stencil, but I was being lazy. I also threw a few leaves into the Crate and Barrel votive holders we received as wedding gifts.

    It's festive and it cost me zero dollars. The decorations will not last forever, but I think my freebies would work well if you were throwing a party.

    Monday, October 24, 2011

    Tailgating & Easy Chili

    A few years ago we started a new tradition hosting a tailgating party for all of our friends. Being a Purdue fan or alumni is not necessary to attend. Each year we try to improve our setup. This year we added a generator and we were able to use slow cookers on site, so I was able to bring chili.

    This is basic chili, but it gets good reviews and it is easy to make.

    Ingredients:
    •  1 pound ground beef
    • 1 cup chopped frozen onion (you can use a fresh onion, but this is easier)
    • 2 cans mild chili beans with sauce
    • 1 can diced tomatoes
    • 1 can tomato sauce
    • 2 tablespoons of chili powder (I usually use 3 when we do not have company)
    • A dash of cumin (It's okay if you don't have this)
    • 1 tablespoon of sugar (this supposedly makes the acid easier on your stomach)
    • kosher salt and ground pepper to taste
    Directions:
    Brown ground beef. Drain grease. Add to slow cooker. Sauté onions in the same pan. Mix all other ingredients together in the slow cooker. Serve once chili is warm all the way through.

    Occasionally I will add cooked stew meat to the chili if I want to make it heartier.

    The weather was absolutely perfect and we had a good time. Notice the gentleman in the back row, third from the left, does not have a body.

    Greg was busy being a pharmacist and could not come. We wanted him to be there in spirit, so we put his head on a stick. He had a lot of adventures, including meeting this bagpiper. After posing with Greg, the bagpiper played us the Purdue fight song.

    {kettle corn party favors}

    We enjoyed watching our tailgating neighbors play lawn jenga. This could be a dangerous sport. I recommend wearing steel toed boots. I found this tutorial online if you would like to make your own. http://www.instructables.com/id/Giant-Jenga-tower/

    Hopefully by Tailgate 2012 we will have our own lawn jenga!


    Sunday, October 23, 2011

    'Live the Life You've Imagined' Part 12

    I think I have fewer photos to share this week because I was busy using my real camera to take photos instead of the iPhone. We spent much of this week preparing for a house full of people for our annual tailgating event at Purdue.

    1. Hens & Chicks in the garden. I love these guys. 2. Bottle of wine to celebrate a grad school interview. (Send me positive thoughts and prayers this Saturday) 3. CSA Veggies. Only one week left and I will miss it. 4. My favorite soup in the world. Lemon Rice from George's. I cannot find a restaurant in Lafayette that serves this. 5. warty gourds. 6. My BFF Stef holding some Venture Tums that expired in 1996. We found them in the astro van.  7. The zinnias are still going strong! 8. Small preview of our new gallery wall. 9. Cozy bonfire in our backyard last night with good friends.


    Thursday, October 20, 2011

    Halloween Mantel


    This fall the white pumpkins have been my favorite. I am getting excited for trick-or-treating because this year we will actually be home to pass out candy.

    Josh decided to start the first fire of the season while I was decorating the mantel. I love the cozy feel of a real fire.

    I made the banners using old book pages. I cut out all of the letters by hand. I really need to get a machine to do this for me.

    As I mentioned before, my parents own a pumpkin patch, so all of my fall goodies are free! I even got some of those pretty mums for my birthday.

    If you live in northwest Indiana, or the Chicago-land area I recommend checking out Kregel's Pumpkin Patch. They have hay rides to the pumpkin patch, a petting zoo, corn maze, pony rides, the farm market and more!

    Wednesday, October 19, 2011

    Wine Tasting in the 'Nappa Valley of the Midwest'

    Last weekend Josh and I went wine tasting with four of our good friends in Lake Michigan Shore Wine Country. This part of Michigan is great for growing grapes and has more than a dozen small wineries. I am by no means a wine expert, but I do enjoy drinking wine and learning more about it.

    Round Barn Winery was the first stop of the day. The building itself was really impressive. Here we purchased their Gewurztraminer. Round Barn also sells beer and spirits.

    {Round Barn Winery. Baroda, MI}

    Our second stop was at Tabor Hill. Here I was able to get up close and personal with some grapes. We purchased their Classic Demi Sec.

    {Tabor Hill Winery. Buchanan, MI}


    We borrowed this lovely 90's Astro van so we could all ride in one vehicle. We affectionately referred to it as the 'Short Bus Party Wagon' and the 'Vino Van.' Given a choice, I would pick the Vino Van over a limo any day.

    Free Run Cellars was the third winery of the day. We purchased their Grappa, which should be great for 'family meetings' on Thanksgiving. (note: Stef is not three sheets to the wind, I encouraged her special pose)

    Domaine Berrien was our fourth stop. At this winery, there is a viewing room so you can see some of the equipment used in the wine making process. They also had a sign that said unattended children will be given an espresso and a free puppy.

    {Domaine Berrien. Berrien Springs, MI }

    Lemon Creek  was the fifth winery on our voyage. This was my favorite winery and we had the best drinking coach at this location. We purchased their peach spumante. There were two dogs that lived here and wanted to be our best friends while we were picnicking. We named the one on the left 'Wolf.'

    Stef packed us a delicious spread of jams, cheese, crackers and other fancy goodies. We saw some other wine tasters who knew how to travel in style.

    The last stop of the day was at Founders Wine Cellar. You can tell that the quality of my photos decreased as the day progressed. Here we used my wine tasting craft. I made numbered paddles to rate the wine. Overall the trip was a lot of fun. Hopefully this becomes an annual tradition.